Thursday, April 26, 2012

Garden Fail...for now

            It is that time of the year when people get their gardening on and yards are full of pretty flowers and yummy vegetables growing. Growing up in a country where agriculture is so important, I was NEVER interested in learning or doing any gardening myself. 
I never realized how accessible and cheap fruits and vegetables were until I moved to this country. Oh how I miss walking outside and completely ignoring the bunches of bananas growing on the tree, the bunches of oranges looking so pretty and the tons of mangoes just laying on the grass waiting to be gathered. I doubt I would ignore then anymore! I would probably be adding up in my head the money I was saving on buying produce. Thankfully, every now and then you can find good sales on fruits and veggies but I am jealous when my mother tells me over the phone about her 3 pineapples (peeled and cut in front of you) for 2 dollars, 10 mangoes for a dollar , 20 bananas for a dollar....I could go on but I won't!
When I moved to Alabama several years ago, I learned that the spring is THE TIME to get your garden in tip top shape and I was easily swayed by all the excitement and sales surrounding veggie plants, flowers and bulbs. My first year was a complete disaster, between the heat being awful and my failure to remember to water my plants, it was money down the drain. The following year I was sold by the Topsy Turvy infomercials and got a few of them. They sure looked pretty around the deck but they were not what I expected. I guess I shouldn't say it was a complete disaster since I did harvest 2 tomatoes, 1 green pepper and 2 yellow squashes * insert eye roll here*.
Back to this year's garden. I spent quite a few days  hours browsing Pinterest for gardening ideas that I considered were up to my kind of slow speed. I decided that after our dogs ate all our veggies last year, maybe container gardening would have a chance. The way I saw it, I could spy on them through the window and keep them from getting in trouble. I didn't want to spend bunches in case it was a disaster AGAIN. So I used up plastic bins I had bought on mega clearance a while ago and drilled holes in them for the excess water to come out. I also read about using packing peanuts, bunched newspaper, pieces of cardboard at the bottom in order to keep you from using tons of dirt.
I thought this would be my year for great gardening results. Everything has been looking great and I even have 7 tomatoes and 5 peppers thriving ( yes, I count them every day). I also have planted summer squash, zucchini and broccoli. The gardener spirit moved me with the broccoli, as I looked at the plants I thought it would be awesome to just go out and cut broccoli right from my deck. I really should blame this broccoli salad recipe that tasted soooo good that it had me wanting to have an unlimited supply of fresh broccoli.
The broccoli was the slowest of all my plants, I thought it was not going to make it when all of a sudden it turned yellow and didn't seems to be growing at all. Pinterest came to the rescue when I read that Epsom salts might give them a little boost and get them going. After a few days and some rain, they started growing at a fast pace and had me imagining big broccoli heads ready to be cut. Sadly, my happiness was short lived when one morning I discovered this :


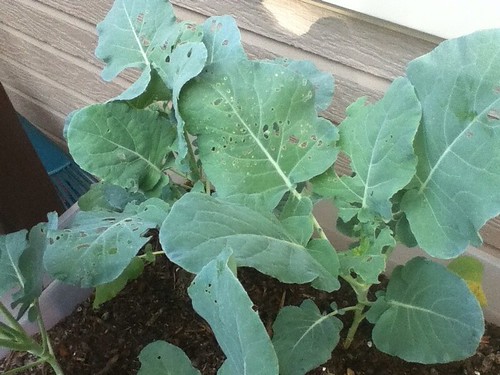
Holes in Swiss Cheese are a good thing. Holes in your broccoli leaves not so much!


I was so sad to see my beautiful plants all eaten up. I kept thinking it was ants or some other critter. I even wanted to blame my dog children but I know Gracie would have eaten up the whole thing and knocked everything down in the process. I talked to my mom about it and since she considers herself an expert on everything plant related she diagnosed it as the green  worms ( or gusanos verdes as she would say ;) ). I somehow went back a few ( maybe 15 or so) years back to my teenage years ( of knowing better than the 'rents) and of course told her it couldn't be any kind of worms that she was completely wrong. I proceeded to do my own research online and there on the first result it was. The horrors of the larvae born from the eggs left by white butterflies. I was totally taken back a few weeks when I commented on the pretty white butterflies on our deck. I kept thinking how odd it was that I had never seen them before and decided it was a sign of the greatness that would become my garden. I should have known better and I should have listened to my mom ( oh, how many times have I said that since becoming an adult? anyway, I digress).
After diagnosing my poor plants, I looked up the treatment. It seems most people agree that squishing the worms is the best thing to do. How do you know you squished them right you ask? the goo inside will be darker green than the actual worm. Can we say YUCK? I vowed right there at 1:45 am that I would NOT do any squishing and proceeded to order some organic stuff that has gotten great reviews from amazon. Gotta love the prime shipping! 
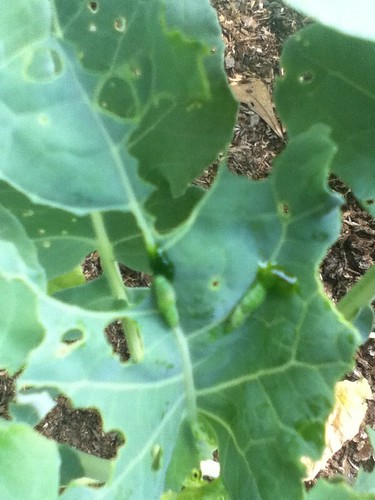
This morning I decided to examine my plants and see if I actually had any worms. I needed to see it for myself ( and make sure I had any while I could still cancel my order). The yucky green worms hide beneath the leaves during the day when they are not eating. It didn't take me long to find this :

Untitled
Not the best picture, but you can see the whole group right there. I bet they were tired after  eating so much!


I was in utter shock at how many worms there are. I think that every other plant has some. You cannot see them from the top so I would have never known. I don't think I will be in the running for gardener of the year anytime soon. I have two days until my organic  Safer-Brand BT shows up, it is people and dog friendly. I wanted to make sure that we would still be able to eat out broccoli after it got healthy.  Apparently, the way it works is that the bacteria actually paralyzes the worm rendering it unable to feed itself, so it goes bye bye.  I still have hopes that my garden will succeed this year. I will update once I have started curing it and let you know how it turns out.
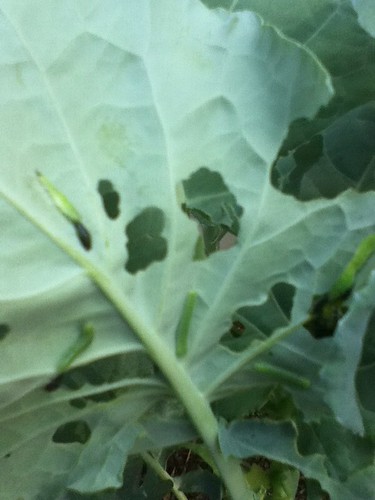
For those of you wondering, I couldn't help but squish a few worms. Curiosity got the best of me! I used the leaf to squish them and yes their insides are darker shade of green so I know I got them good. Worm Squishing...NAILED IT!


Untitled
Definitely not a great gardener or picture taker ha! but you can see the yucky green innards I squished out! 


Follow Me on Pinterest

Monday, April 23, 2012

The 2 Buck Lid Fix

        I am sure that by now I have made it pretty obvious that I am a total Pinterest addict. I love finding organizing tips and trying to make them my own. Making them my own means trying to figure out how to make it work for me without involving large sums of money or contractors ;).Of course, a girl can always dream about a kitchen like THIS one while pinning to her hearts content. But back to reality for now.I obviously do not have a designer kitchen, my home is not a showroom but I am proud of its warmth and coziness. I love cooking and the kitchen is my favorite room. I never knew that I had it in me, especially when you consider my mother doesn't really know how to boil water. But that is a whole other story...
Back to the kitchen, I love cooking and baking. The one thing I hate is trying to keep it organized. Do you remember this commercial for Rubbermaid Easy Lids Containers? the lady opens her cabinet and the containers and lids come tumbling down? Sound familiar? I so COULD  relate to that. I swear plastic containers must reproduce in the dark or something.
Every so many weeks, when the mess would get on my nerves ( or I couldn't close the door) , I would attempt to stack them together and organize. It seemed that as soon as I did that, the one lid I needed was at the bottom of the pile and therefore reaching it was a major accomplishment that most likely resulted in everything being a mess again.
One of my New Year Resolutions was to declutter and try to organize my home. I browsed Pinterest for ideas, finding all sorts of nifty racks and specialized cabinets. They looked great but  after a quick search  I realized it was not in my budget. One of my searches brought me to this post by Better Homes & Garden :


Photo source: www.bhg.com 


I don't have a drawer for my containers. I use part of my cabinet so therefore I needed to find a way to make it work for me. I was not sure how much I was willing to spend, but I was sure that I didn't want to invest much in case it was not functional and I ended up hating it. While walking around the Dollar Tree one day, I noticed their plastic dish racks. These are not the best quality but for a buck you cannot expect much. I decided that the slots were fairly similar to the idea pictured in the racks above. I decided that a 2 buck investment was safe enough and got them right away. I separated my plastic lids from the pots and pans. I tried to arrange them by size so that the smaller ones would be closer to reach. Once I did that , as a last minute idea, I decided to throw all the plastic containers in a crate and put the crate in the cabinet as well. I pull it out whenever I need one and Imagine is a pull out drawer like so many I have seen on Pinterest ha! Gotta love an active imagination!. Anyway, This is what it looks like :


Hazardous Stack. My toes are witness of the dangers of falling lids.


Two Dish Racks, one for plastics, one for pot lids. The Largest all the way to the back since  I don't use them often. I Even had room for my cutting board!


Right Next to the lids, an old crate full of plastic containers. It is super easy to pull out and get what I need, then stick it back in..


Like I said at the beginning, my house is not a showroom. We are fans of simple, inexpensive and practical. The 2 buck fix fits all that to the T. My toes will be happy not to be injured again and I will no longer be afraid of opening that cabinet door. I will say , as far as lid organizing...NAILED IT!


Follow Me on Pinterest

Thursday, April 19, 2012

Apple Bundt Cake Fail

        Since being transplanted to the South almost 3 years ago, there are certain things that I have learned to love. Among them are cooking, southern drawls, sweet tea, biscuits, REAL banana pudding, Alabama Football and of course Southern Living Magazine. Although I have yet to master the art of Southern Cuisine, I make attempts constantly.
The other day I had a few leftover apples that were about to go downhill and a craving for cake. I immediately thought about this recipe featured in the September 2011 issue. Doesn't it look just scrumptious?


From Southern Living September 2011 Issue. 
                                                                        Photo: Luca Trovato; Styling: Buffy Hargett


I should have known that the fact that I was out of flour was a sign from above but of course I decided I would  "MacGyver" it. I figured I would make MY version inspired by the deliciousness above using a pre made mix and substituting the liquid in it for my chopped and cooked apples. This was my box of choice 


Cinnamon cake and Apples are the perfect  solution right? WRONG!


I proceeded to cook my chopped apples with 1/4 cup of brown sugar and a dash of nutmeg, cinnamon & cloves. The House smelled delicious while they cooked. Once they were soft and cooled I mixed with the crumb cake mix and one egg. Baked according to box directions and accepted all the compliments on HOW GOOD it smelled while it was baking. I was already picturing the lovely ways I would portray it on here and how I would ice it to look close to the one in Southern Living.
 Because I was SO SURE it was going to come out great, I decided to talk about it and offer it as dessert to our hosts for dinner the next night. I bragged that the house smelled delicious and that the batter was scrumptious ( note: Raw cake or cookie batter is BAD for you and could make you real sick ). When my timer went off, It looked perfect and after the cooling timer was done I was ready to take it out of the pan.
To my horror, this is what It looked like :


Half the cake means Half the calories, right?


Do you think icing would cover these IMPERFECTIONS? 


Although I thought frosting it might cover an imperfection or two, there was not enough icing to cover the fact that half the cake was stuck to the pan. And even though it looked terrible, it was the most delicious apple cake I have ever had. In my sadness, I almost ate off the half that I scraped off the pan so trust me when I say it was delish! After I came down from my cake induced high, I remembered me and my big mouth had already offered to bring it for dessert, talk about blowing it.What was I going to make now? I have NO FLOUR.
I called my gracious hostess and explained my predicament. I must have really sold her on how GREAT it tasted because we decided that no one would have to know it wasn't supposed to look like this. We would just call it the  artisan look and put a big dollop of whipped cream on the top and a bowl of ice cream on the side. Everyone loved it and shared laughs over my failed attempt. Of course one could say that how can you not love something when there is whipped cream and ice cream involved ;). 
On the bright side, it gave me something to write about ha! So until next time I leave you with this, in honor of my favorite cookie monster meme :


Friday, April 13, 2012

The Allergy we thought we had nailed

      It seems like nowadays allergies are all around us.If its not the new and ever growing food allergies, it's the terrible pollen flying around this season. My car used to be a very neutral beige/champagne color now it alternates with that lovely yellow green pollen shade ;).As much as I would like to say that this was a post for seasonal allergies or an endorsement for Claritin or some OTC allergy medication it isn't. 
This post is actually a sad/funny story of how we thought we had adopted the most sensitive and allergic to food mutt ( I say that lovingly) in the world only to find out almost a year and several food brands later that she wasn't.... She just has a case of slow reactions or an insensitive booty! 
Gracie came to us last summer after being abandoned twice. After being left by her first owners on the side of the road when she was barely a month old. The family who took her in from in front of their house decided they wouldn't keep her any longer after she had tore up their backyard and eaten some plants. They were all done with her and ready to send her to the shelter. So before being taken to the humane society she was "offered" to us. At the time we were still sad about losing our beloved Momo at age 14 but knew our 1 year old Joey needed a companion desperately. The thought of her being taken to the humane society at about six months old, after our April tornadoes that displaced so many doggies around here made us worry about her future. We decided maybe it was a sign that we could save her!

Gracie  found her forever home in June 2011.
When we picked her up to bring her home, she was a scared little thing. Loud noises, gestures and even looks were enough to have her flopping over on her back giving up. She has never been crate trained or potty trained and had basically been an outside dog.
During her first few weeks here she was everything but graceful which made her name so ironic. Between stepping on everyone, being a klutz,playing with her new found brother having a few accidents in the computer room,eating my veggie garden, a pair of flops, and making a mess with her water bowl she gave us plenty to do.She tried to please us but we knew she wasn't the fastest learner. Regardless,she stole our hearts and made Joey so happy. You have never seen two dogs play so much!
One day out of nowhere she started having all these bumps along her bottom, belly and paws. She would itch so bad it wouldn't let her rest and we decided it must have been the food. Joey seemed unaffected so we thought it wasn't anything in the house. You might be thinking we were feeding some off brand food but we were actually feeding her Halo. Halo is one of those holistic natural foods that shouldn't have messed with her skin or tummy. We started our quest with different foods trying to identify what she was allergic to. In just a few weeks we were Single- handedly keeping the dog food business afloat ;). We Researched brands and formulas, ingredients and prices. We bought some Bill- Jack choosing a low grain formula, Blue Buffalo, Another Halo flavor, etc.For such a tomboy she was quite the princess when it came to food. No matter the brand, the bumps were there and at times worse.
I had decided she was allergic to beef, pea protein, lamb, salmon, corn and even chicken! The last brand we tried was NATURAL BALANCE Limited ingredient formula. Claiming to have just six ingredients mainly sweet potato and duck I NEEDED it to be the right one.
Lo and behold after a few days her bumps started getting better and shed go through the night without scratching. Soon after her fur became so soft and shiny it was like the princess within her started emerging and leaving the tomboy behind. We were so impressed that we switched Joey over to that food too. They have the softest fur and I call them my personal stuffed animals..so cuddly! 
Now that they are BFFs they share toys, beds,
blankies, treats and even their water bowl!
We thought we'd never have issues again until a few weeks ago when the bumps and the itching started all over again. I was shocked and knew it couldn't be the food. I was not ready to go down that path again!. For a few days I followed her every move to see if there was a plant or something she was doing outside that could be causing it. You know how sometimes answers are right in front of you and your completely miss them? Yea, been there and done that. While I searched the yard, Gracie would watch me attentively while she sat on the cement pad next to the ants! She sat there every day and she sure don't react to them. I don't understand why she doesn't move away!! It's like it doesn't bother her while they bite her but afterwards boy does she itch and suffer! I made her move and have gotten rid of the ants since, but if course now I know that THIS is what happened last year and that her sensitive food allergies were caused by her insensitive booty!!!
Talk about a failed allergy discovery! Oh well, at least now we know what it was and to keep our eye on where she sits. As for nailing something? I think we nailed it with the food, the limited ingredient formula has worked great for them, Every furry is different, what works for some might not work for others so I am not saying their food is the best thing since sliced bread ;). All I know is that itkeeps them at a healthy weight, with a nice shiny coat and of course extra cuddly! Of course the greatest of all is that Gracie stole our hearts and has completed our little family for almost a year now :)

Like Roger Caras said : Dogs are not our whole life, but they make our lives whole. ( These two sure make ours whole! 


Wednesday, April 11, 2012

Peep Springy Chocolate Cake


Hi Everyone!
                      As usual, when there is time to kill on Pinterest , I always stumble upon the cutest or yummiest looking pins that I HAVE to test out. The lucky winner this time was a Peep cake originally posted here by kayleesgrammy. Sadly, it had no instructions only the actual picture of her beautiful peep & M&M's creation.
I decided that I was going to give it a try because not only did it look precious but it would be a great centerpiece for our Easter Dinner. Since I have no great baking skills i resorted to old trusted cake mix! ( for any bakers out there, do not stone me! ) this my first time ever layer cake adventure so I didn't want to make it too hard on myself . I also figured that the M&M's would be a bit too much for us so I substituted with a few jelly beans and some purple sugar. The Recipe Follows!


Peep Springy Chocolate Cake


1 Box of Chocolate Cake Mix + 3 eggs, oil, and water as instructed on box ( I used Pillsbury Dark Chocolate Cake)
1 tub of  Frosting  ( I used Pillsbury Vanilla Frosting)
Assorted Colored Peeps
Colored Sugar
Handful of Jellybeans


Prepare cake mix following the instructions on the back of the box. Use two 9 inch round pans and cool completely for best frosting results. I took an extra step and decided to use my new mixer*** to whip up the frosting in order to spread it easier and use a bit less. ( they do sell whipped frosting that is easier to spread, but technically you are paying more for less frosting a big no no in my book ;))
Place your first layer on the cake stand or platter you will be using and frost the top lightly. You can sprinkle some of the jellybeans for a sweet surprise when cutting. Place the second layer on top and proceed to use up the rest of the frosting until it is evenly frosted. Place peeps around the sides, sprinkle some colored sugar and a few jellybeans on top. Voila! Let the ooh and ahhh's begin! 


This is what mine looked like :


My photographic skills do it no justice, but the best proof that I Nailed it was that it was gone by the next day! Til next time!


***  My new mixer was a Christmas gift. You can tell you are an official grown up when you get an appliance for Christmas and you are EXCITED about it! Remember in the great words of Casey Stengel :  The trick is growing up without growing old!


Follow Me on Pinterest

Monday, April 9, 2012

The Wooden Spoon that could

        Before we dive into this one, I must admit this experiment was both a nailed and a failed it ha!. I found this really good trick that was originally posted here and decided to give it a try. I am sure we can all relate when you are cooking pasta and trying to multitask only to hear the whooshing sound of the pot boiling over (lets not even tap into the yuck leftover to clean up afterward ugh!). 
According to A small snippet, by placing a wooden spoon across the top of the pot would keep it from boiling over. I had one of those Why didn't I think of that? moments that happen so often when browsing Pinterest and decided to put it to the test. My first try was a complete failure, the pot boiled right over as if there was nothing over the top of it. I was SO SAD! But I figured I needed to give it a second try. A few days later I made my people have pasta for dinner AGAIN! and  followed the same process. Place the same wooden spoon across the top and wait until its boiling like there is no tomorrow. To much of my horror It spilled over one more time and I wanted to throw the pot out the window. Can someone please come up with some crazy easy way to keep your stove top spic and span??? I would love you forever ;). Anyway back to my failed experiment I went trying to figure out what I did wrong. I kept reading about people trying it and it working to perfection, so what was wrong with mine?
It hit me that the handle of my spoon was not that long and that both times I had used the same spoon. So my brainiac self decided to try a bigger spoon and guess what happened
* insert dramatic pause and background music*  to my happiness IT WORKED!. You can see it doing its magic right below:


What I learned:
- You must use a big spoon
- If it doesn't work the first time, try it again with a different utensil
- Not worrying over a boiling pot and being able to walk away without fearing the boiling over demon is AH-MAY-ZING :)


Til next time..Keep nailing it!

Friday, April 6, 2012

Peeptastic!

 So Easter is just a couple days away and I am blown away by the creativity and cuteness of  some crafty bloggers. Browsing Pinterest a few days ago, I came across this lovely idea posted by In Due Time. Her blog is great btw, if only I was that creative!
As a result, I decided that I could make my version of the Peep pops so I could gift them to my neighbors.Long Story short, they had surprised us with some cookies and popcorn balls for Christmas and we never really got them anything ( I know its April! bad neighbor? maybe, but hey, we were a sick household at the time...I will spare you the stomach flu over Christmas story ;) ). 
But I digress, as I saw the peep pops I figured this idea was great because not only did  it look cute and easy enough , but I figured the whole thing would be pretty inexpensive (bonus!). So  after heading down to Wally World for my stuff I was ready to stick them peeps in a stick. Seriously, How much easier could it be??
Now, before anyone tells me that the pops could have been placed in a more aesthetically pleasing way or points out to the unbalanced placing of the fake grass I will say that for all intended purposes... I NAILED IT!!!


SHope you all have a peeptastic Weekend and a really GOOD Good Friday!! Til Next time!


- I.M


Follow Me on Pinterest